
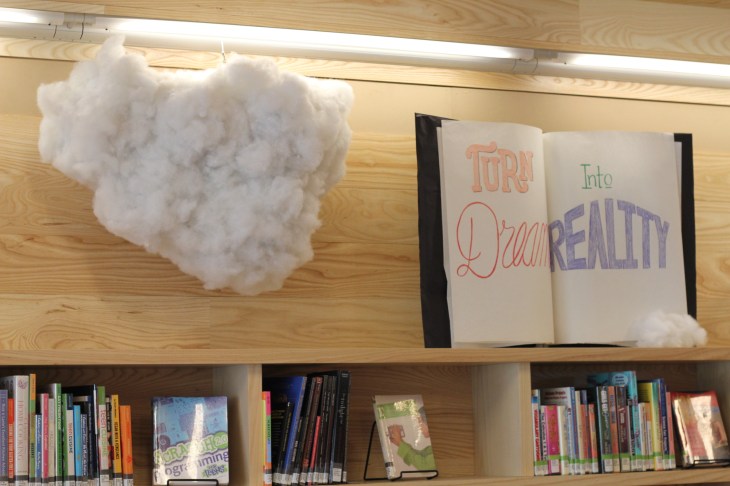
Arts and crafts are fun! We’ve struggled with how best to create displays in our new space. We’ve also had trouble finding the time to do more than a simple sign. But for Teen Read Week, we decided to try a project I’ve always wanted to do: make clouds.
To make the clouds, I adapted this tutorial.
Supplies for clouds:
- 24 white balloons
- masking tape
- newspaper
- flour + water OR diluted Elmer’s glue
- white spray paint
- spray adhesive
- batting (fluffy white polyester pillow stuffing)
Step 1: Blow up balloons and use the masking take to assemble them into cloud shapes.
Step 2: Mix up your adhesive paste. We used a plain 2:1 flour water recipe, but if I had to do it again, I would go the Elmer’s glue route. There are basically 3 versions you can make.
Step 3: Tear newspaper into long strips, dip in paste, and lay over the balloons until they are all covered.
Step 4: Allow to dry for 24 hours.
Step 5: Spray paint white. Allow to dry for several hours.
Step 6: Apply batting with spray adhesive. You will need more spray adhesive than you think.
It ended up taking a lot longer than I thought. The clouds needed to dry for over 24 hours after the newspaper and paste mixture was applied. Then, they were going to look like very dirty clouds unless we spray painted them, and that took several hours to dry. Then on the third day, we were finally able to adhere the batting. Next time I do paper mache, I would use the diluted glue method rather than the flour, as some mold started growing on one that had been left to dry that was lying on my garage floor rather than hanging. I also think that more smaller clouds might have worked better for the space and been easier to store and transport. We have an art rail that hangs underneath the lights, and it isn’t as functional as I had hoped when they pitched us the idea. I also wish we would have put blue paper along the entire wall, but it was going to take more time in an already time-consuming project that was largely done outside of work.


One of the assistants in the children’s room made all the books for us (she teaches book-binding at our local arts center). The teen librarian made the dirigible. All together, I think it was a fun take on the YALSA Teen Read Week theme. Inside the largest book, we mimicked the Teen Read Week design and slogan, but this could be used for any sort of theme, really. The display shelves below showcased titles from the various YALSA award lists. All together, I think it was a fun take on the YALSA Teen Read Week theme.

I love that display! …And kind of want to make clouds and just hang them in my room.
Haha, another friend suggested they’d be a hit for decorating nurseries! I do think it would get dusty after a while though…
What a whimsical display! You make such an effort to make the environment as creative and inspiring as the reads. I want those clouds!